How Does 3D Rendering Work: Process, Software, and Applications
A Complete Guide to 3D Rendering: Techniques, Tools, and Industry Uses
10 MIN READ
April 22, 2025

Written By
Sasikumar Janakiraman
Understanding how 3D rendering works isn't just useful for designers—it’s essential for brands looking to streamline content creation, speed up design workflows, and offer next-gen customer experiences. Whether you’re in product design, marketing, or architecture, the process behind rendering can shape how you plan, budget, and scale your visuals.
In this blog, we’ll break down the key stages of 3D rendering, explore popular software tools, and show how brands across industries are putting it to work. Let’s get started.
What Is 3D Rendering?
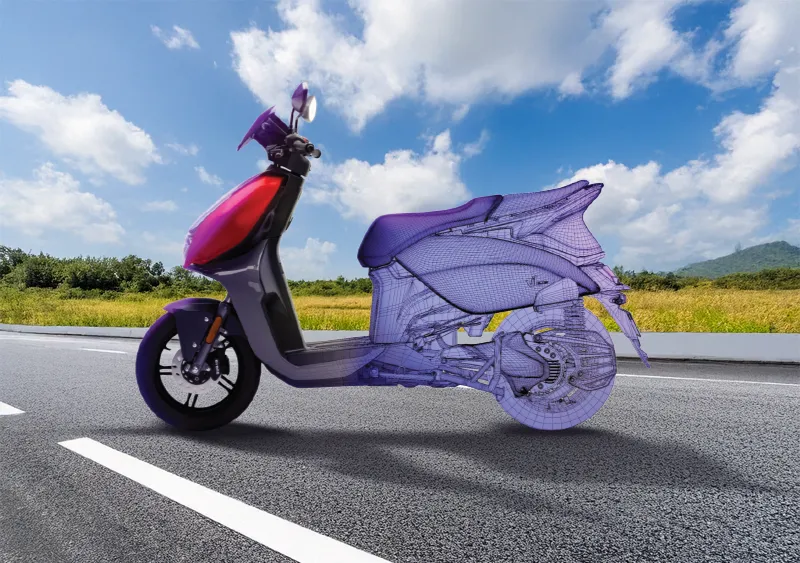
At its core, 3D rendering is the process of converting a 3D model into a two-dimensional image that looks as close to real life as possible. It’s the final stage of a digital design pipeline, where textures, lighting, and camera angles come together to create a photorealistic visual.
Think of it like photographing a product that doesn’t physically exist yet. Designers build the structure in 3D space, apply materials, adjust lighting, and then render the scene into a high-quality image or animation.
There are different types of 3D rendering based on output needs—static images, interactive experiences, or full-motion videos. But all of them rely on the same principle: turning digital models into visuals that communicate design, shape, and intent with absolute clarity.
For industries like furniture, architecture, and eCommerce, this process has become essential for selling products and concepts before they’re ever built or manufactured.Learn the full process in this step-by-step guide on how to make 3D renders.
The 3D Rendering Process: Step-by-Step Breakdown
Creating a stunning 3D render isn’t a one-click operation. It’s a structured process that blends creative vision with technical execution. Here’s how it typically works, from concept to final delivery.
Step 1: Concept and Modeling
Everything starts with an idea. It might be a hand-drawn sketch, a technical drawing, or a CAD file. From there, designers build a 3D model using tools like Blender, 3ds Max, or SketchUp.
This phase focuses on form—getting the geometry, scale, and structure right. Think of it as building the digital skeleton before adding any color or detail.
Step 2: Texturing and Materials
Once the shape is ready, textures bring it to life. Artists apply materials like fabric, wood, leather, metal, or glass to different parts of the model.
PBR (Physically Based Rendering) techniques are often used to mimic how materials behave under real lighting—like the softness of fabric or the shine of chrome. It’s these fine details that make a render feel realistic.
Step 3: Lighting Setup
Lighting defines the mood and depth of a render. Depending on the scene, designers simulate natural sunlight, indoor lighting, or even dramatic studio effects.
Shadows, highlights, and reflections are carefully adjusted to enhance realism. Without the right lighting, even the most detailed model can fall flat.
Step 4: Camera and Composition
Next comes the framing. Virtual cameras are positioned to capture the model from the best angles, just like a product shoot.
Wide shots, close-ups, and 360-degree views can all be created to suit different marketing or presentation needs. Good composition ensures the final image draws the viewer’s eye exactly where it needs to go.
Step 5: Rendering Output
Now the heavy lifting begins. Rendering engines like V-Ray, Corona, Arnold, or Cycles process the scene into final visuals. This can take minutes or hours depending on the complexity and quality settings.
Whether it’s a high-res still, an animated product demo, or an interactive 360, the final render is exported in the required format, ready for use in web, print, or AR.
Step 6: Post-Production
Even after rendering, there’s room to polish. Final tweaks are made in tools like Photoshop or After Effects. Color correction, brightness adjustments, and minor touch-ups are done to perfect the image.
This stage ensures your visual meets the brand standard and looks flawless across platforms.
The 3D Rendering Process: A Real-World Walkthrough
Creating a high-quality 3D render is much more than pressing a button. It’s a layered process that blends design thinking, software skill, and storytelling. Whether you’re building a furniture render for eCommerce or an architectural visualization for client approval, the steps follow a practical flow, each one building on the last.
Here’s how the process actually unfolds:
Step 1: Start with Modeling the Basics
Every 3D render begins with a blank canvas. Designers take a product sketch, CAD file, or concept idea and begin shaping it inside software like Blender, SketchUp, or 3ds Max. This part is all about structure, getting the shape, proportions, and dimensions just right.
For example, in furniture rendering, the goal is to accurately model the legs, frame, cushions, or fabric folds with correct scale. There’s no texture or lighting yet. Just the raw geometry.
Step 2: Add Textures and Realistic Materials
Once the form is set, it’s time to apply surfaces. Designers use libraries or custom textures to simulate wood grain, velvet fabric, polished metal, or any other finish the product includes.
This is where attention to detail makes a big difference. If the texture scale is off or the fabric looks flat, the model will feel fake. Most rendering professionals follow a method called PBR (Physically Based Rendering), which ensures that materials reflect light and behave like they would in the real world.
Step 3: Set the Mood with Lighting
Lighting is more than just making things visible,it defines mood, depth, and realism. In this stage, digital light sources are added to the scene. These might mimic natural daylight, studio spotlights, or cozy indoor lighting.
Shadow placement, reflections, and the direction of light are all tweaked to match how a real-world camera would behave. A well-lit render can make a product look luxurious, soft, or dramatic depending on the tone you want to communicate.
Step 4: Frame the Perfect Shot
With the model lit and textured, it’s time to decide how you want to present it. Just like in photography, the camera angle, zoom, and composition all influence the final impact.
Designers place virtual cameras around the product to capture different angles—front, side, close-up, or even aerial views. Some use wide shots for lifestyle scenes while others frame tight details like stitching or finishes.
Composition techniques like symmetry, balance, and the rule of thirds still apply in the digital world.
Step 5: Render the Scene
Rendering is where the computer steps in. The software calculates light behavior, material reflections, and camera depth to create the final image. Depending on how complex the scene is, rendering might take minutes or even hours.
Popular rendering engines include V-Ray, Corona Renderer, Arnold, and Cycles. Some are better for realism while others prioritize speed or animation output.
The result? A high-resolution image or animation that’s ready for marketing, eCommerce, AR, or client presentations.
Step 6: Final Polish in Post-Production
Even the best renders benefit from a little cleanup. Once the image is rendered, designers often adjust brightness, contrast, or saturation using tools like Photoshop or After Effects.
Sometimes additional elements are added—like shadows under a product or slight background blurs, to enhance realism. This is also where small imperfections get fixed before the asset is delivered to the client or used in a campaign.
Popular Software Used in 3D Rendering
Behind every stunning 3D visual is a set of powerful tools. From creating the basic model to generating photorealistic renders, the right software makes all the difference. Depending on your industry and workflow, different tools serve different purposes—some focus on modeling, others on lighting, realism, and final rendering.
Let’s break it down into two core categories: modeling tools and rendering engines.
3D Modeling Software
These are the tools artists and designers use to build the base structure of a product or environment.
- Blender
An open-source tool that’s surprisingly powerful. Blender is popular for both product and animation rendering. It’s flexible, free, and has an active global community. - Autodesk 3ds Max
A favorite in architecture, furniture, and interior design. 3ds Max offers strong modeling features, detailed geometry control, and excellent plugin support. - SketchUp
Known for its simplicity and speed, SketchUp is widely used by interior designers and product developers. Its intuitive drag-and-drop interface makes it ideal for quick concept modeling.
Rendering Engines
Once a model is ready, rendering software helps bring it to life with lighting, textures, and realism.
- V-Ray
This industry heavyweight is used by studios around the world. Known for its photorealism, V-Ray works well with tools like 3ds Max, SketchUp, and Rhino, delivering sharp, professional-grade results. - Corona Renderer
Corona is popular among architectural visualization teams. It’s fast, affordable, and known for delivering high-quality results with a simpler learning curve. - Lumion
A real-time rendering engine tailored to architects. Lumion excels at creating animated walkthroughs, flyovers, and exterior environments with rich detail and fast processing. - KeyShot
Often used for product design and animations, KeyShot is known for speed and usability. It supports real-time rendering and is especially effective for showing off materials, lighting effects, and exploded views.
Choosing the right combination of modeling and rendering software depends on your product type, team size, and output goals. At ZealousXR, we work across all major platforms to match the best tools to your project needs.
Applications of 3D Rendering Across Industries
3D rendering is no longer limited to one niche. From architecture to eCommerce, its ability to turn concepts into lifelike visuals makes it a valuable tool across a wide range of industries. Let’s explore how different sectors are using 3D rendering to work smarter, market better, and communicate more clearly.
Architecture & Real Estate
Before a single brick is laid, architects and developers use 3D rendering to show clients exactly what a finished project will look like. Exterior flyovers, interior walkthroughs, and lighting simulations all help stakeholders visualize the space in context.
This not only speeds up approvals but also reduces design revisions and miscommunications. Real estate teams are also using 3D visuals to market properties long before construction is complete, helping buyers emotionally connect with a space.
Furniture & Product Design
Physical prototypes take time and money. With 3D rendering, designers can showcase multiple colorways, materials, and finishes without building each one.
It’s also the backbone for online configurators, where customers can personalize products and see updates in real time. Whether it’s for eCommerce, virtual showrooms, or printed catalogs, 3D helps brands speed up product launches and test ideas without waste.
Looking for 3D furniture rendering services? Then, we are here to help!
eCommerce & Advertising
Online shoppers rely on visuals to make decisions. That’s why more brands are replacing traditional product photography with flexible, photorealistic 3D renders.
360-degree views, zoom-in details, and animated product showcases increase engagement and reduce uncertainty. For marketing teams, having a reusable digital asset means faster campaign rollouts and more content without new photoshoots.
Interior Design & Virtual Staging
Drag-and-drop virtual staging tools powered by 3D models are transforming how designers pitch ideas. Instead of relying on mood boards, they can present fully furnished room layouts with exact products and materials.
This is especially helpful for virtual showrooms or online marketplaces, where customers can explore styled spaces interactively. For designers working remotely or pitching to clients abroad, it’s a powerful way to close the visual gap.
How ZealousXR Delivers End-to-End 3D Rendering Solutions
From Concept to Post-Production, We’ve Got You Covered
At ZealousXR, we don’t just deliver visuals. We provide full-scale rendering solutions built to fit your workflow, timeline, and creative vision—no internal design team needed.
Our process starts with understanding your project goals. Whether you're launching a furniture line, pre-selling a property, or building an immersive eCommerce experience, we tailor every visual to your brand’s specific needs.
Here’s what we handle from start to finish:
- 3D modeling: We transform sketches, CAD files, or concepts into detailed digital models
- Texturing and materials: Every surface is styled with accuracy—from wood grains to polished metals
- Lighting and composition: We craft scenes that match the tone and purpose of your project
- High-resolution rendering: Stills, 360s, animations, or virtual walkthroughs delivered in your preferred format
- Post-production polish: Final edits and enhancements ensure the visuals are campaign-ready
With fast turnarounds and consistent quality, ZealousXR - best 3D rendering company trusted by global brands across furniture, architecture, real estate, and eCommerce. We’re here to make your products and spaces look their absolute best—before they even exist.
Conclusion
The way we present products, spaces, and designs has changed. Today, visuals are more than just supporting assets. They’re central to how we sell, market, and connect with customers. And 3D rendering makes that entire journey faster, smarter, and more flexible.
Whether you're building a digital storefront, showcasing a new property, or developing an immersive configurator, understanding how 3D rendering works puts you one step ahead of the curve.
You don’t need to build a team from scratch or learn new tools. What you need is a partner who knows the process, understands your industry, and delivers visuals that move your business forward.
ZealousXR helps you bring every design, product, or project to life—pixel by pixel, scene by scene. Let’s build something extraordinary.
About the writer :
Sasikumar Janakiraman, as the Creative Director at Zealous Services, brings a unique mix of creativity and technical ... skill. He’s passionate about 2D and 3D design, leading teams to create stunning 3D models and visualizations. Sasikumar loves working closely with clients, making sure their ideas come to life in the best possible way. His goal? To make design feel simple and exciting.
Read MoreFrequently Asked Questions (FAQ)
How long does it take to complete a 3D rendering project?
Timelines vary based on complexity. A simple product render might take 2–3 days, while a detailed architectural walkthrough can take a week or more. With optimized workflows, ZealousXR ensures fast delivery without compromising quality.
What industries benefit most from 3D rendering?
3D rendering is used across architecture, real estate, furniture, product design, advertising, and eCommerce. Any industry that relies on visual storytelling or product visualization can benefit from it.
Do I need technical knowledge to work with a 3D rendering company?
Not at all. At ZealousXR, we handle the technical side for you. You just need to provide your design files, concepts, or references—we take care of modeling, rendering, and post-production.
What’s the difference between 3D modeling and 3D rendering?
3D modeling involves creating the structure or shape of an object in a digital environment. 3D rendering is the next step—transforming that model into a photorealistic image or animation with lighting, textures, and camera perspectives.
Can 3D renders be used across different platforms?
Yes. One 3D asset can be repurposed for eCommerce listings, print catalogs, AR applications, virtual showrooms, and marketing campaigns—saving time and cost across teams